NestJS 기초 사용 방법

NestJS 기초 사용 방법에 대해 설명하는 페이지입니다.
Environment
- Node.js v20.11.1
- @nestjs/cli v10.3.2
- reflect-metadata v0.2.2
목차
- 개요
- Step 1 - NestJS 애플리케이션 생성
- Step 2 - eslintrc 설정 파일 수정
- Step 3 - Folder Structure / Architecture 확인하기
- Step 4 - Blog API 만들기
- Step 5 - Postman으로 테스트하기
- Comments
개요
이번 글에서는 NestJS 기초 사용 방법에 대해 설명하도록 하겠습니다.
Step 1 - NestJS 애플리케이션 생성
다음 명령어를 입력하여 @nestjs.cli를 사용하여 NestJS 애플리케이션을 생성합니다.
npx @nestjs/cli new [프로젝트 이름]
명령어를 입력하면 어떤 패키지 매니저를 사용할 것인지를 결정해야 합니다. 저의 경우 npm을 선택하였습니다.
? Which package manager would you ❤️ to use? npm
Step 2 - eslintrc 설정 파일 수정
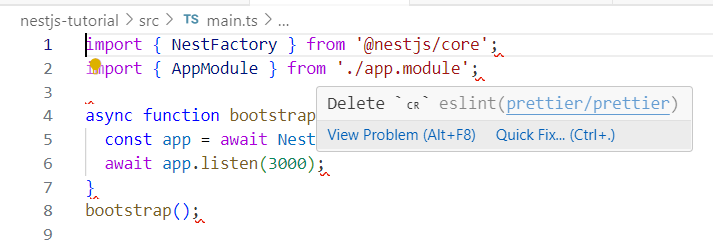
자신이 사용하는 운영체제에 따라 다음과 같이 Delete ␍ eslint (prettier/prettier) 오류가 발생할 수 있습니다.

이 오류가 발생하는 경우 .eslintrc.js 파일을 열고 다음과 같이 endOfLine에 내용을 추가하거나 변경하면 됩니다.
rules: {

  (...)

  'prettier/prettier': [
    'error',
    {
      endOfLine: 'auto',
    },
  ],
},
Step 3 - Folder Structure / Architecture 확인하기
nest-cli로 생성한 프로젝트 구조는 다음과 같습니다.
├── src
|   ├── app.controller.spec.ts  // 컨트롤러 테스트 코드
|   ├── app.controller.ts       // 컨트롤러
|   ├── app.module.ts           // 모듈
|   ├── app.service.ts          // 서비스
|   └── main.ts                 // 서비스 메인 파일
├── .gitignore                  // git 버전 관리에서 제외할 목록 지정
├── .prettierrc                 // 코드 포매팅 관련 설정 파일
├── nest-cli.json               // nest-cli 설정
└── (...)
NestJS의 Naming 규칙
NestJS의 Naming Convention은 다음과 같습니다.
- 파일명은
.으로 연결하며, 모듈이 둘 이상의 단어로 구성되어 있으면대시로 연결합니다.// <모듈명>.<컴포넌트명>.ts blog.controller.ts my-first.controller.ts - 클래스명은
Pascal Case로 표기합니다.// <모듈명><컴포넌트명> BlogController - 같은 디렉토리에 있는 클래스는 index.ts를 통해서 임포트하는 것이 권장됩니다.
- 인터페이스를 사용해서 타입을 정의하고 구체적인 내용을 클래스를 만들어 인터페이스를 상속하는 방식으로 작성합니다.
main.ts
main.ts 파일은 NestJS 서버의 시작점이 되는 파일입니다. NestJS에서는 진입점을 bootstrap()으로 하는 것이 관례입니다.
import { NestFactory } from "@nestjs/core";
import { AppModule } from "./app.module";

// NestJS를 실행시키는 함수
// NestJS에서는 진입점을 bootstrap()으로 이름 짓는 것이 관례이다.
async function bootstrap() {
  // NestFactory를 사용해서 NestApplication 객체 생성
  const app = await NestFactory.create(AppModule);

  // 3000번 포트로 서버 기동
  await app.listen(3000);
}

bootstrap();
모듈명.controller.ts
컨트롤러는 유저가 보낸 HTTP 요청을 어떤 코드에서 처리할지 결정하는 역할을 합니다.
import { Controller, Get } from "@nestjs/common";
import { AppService } from "./app.service";

@Controller() // 컨트롤러 데코레이터
export class AppController {
  // 외부에서 사용하므로 export를 붙임.

  constructor(private readonly appService: AppService) {}

  @Get() // GET 요청 처리 데코레이터
  getHello(): string {
    return this.appService.getHello();
  }
}
모듈명.service.ts
서비스는 비즈니스 로직을 담는 파일입니다.
import { Injectable } from "@nestjs/common";

@Injectable()
export class AppService {
  getHello(): string {
    return "Hello World! 안녕하세요!";
  }
}
모듈명.module.ts
모듈은 수평적으로 흩어진 Provider와 Controller들을 논리적인 기능이나 도메인에 따라 하나로 묶어주는 역할을 하며, 재사용성을 높여줍니다.
import { Module } from "@nestjs/common";
import { AppController } from "./app.controller";
import { AppService } from "./app.service";
import { BlogModule } from "./blog/blog.module";

// 모듈 데코레이터
@Module({
  imports: [],
  controllers: [AppController],
  providers: [AppService],
})
export class AppModule {}
Step 4 - Blog API 만들기
데이터베이스를 사용하지 않는 간단한 Blog API를 만들어 보겠습니다. 먼저 다음과 같이 모듈 단위로 애플리케이션을 구성합니다.
├── src
|   ├── app.controller.spec.ts
|   ├── app.controller.ts
|   ├── app.module.ts
|   ├── app.service.ts
|   ├── main.ts
|   └── modules
|       └── blog
|           ├── blog.controller.ts
|           ├── blog.module.ts
|           ├── blog.service.ts
|           └── dtos
|               └── blog.dto.ts
└── (...)
modules 디렉토리에 도메인별 모듈을 저장합니다. 각 모듈은 해당 기능과 관련된 컨트롤러, 서비스, DTO 등을 포함합니다.
blog.controller.ts
import {
  Body,
  Controller,
  Delete,
  Get,
  Param,
  Post,
  Put,
} from "@nestjs/common";
import { BlogService } from "./blog.service";
import { PostDto } from "./dtos/blog.dto";

@Controller("blog") // 클래스에 붙이는 Controller 데코레이터
export class BlogController {
  constructor(private readonly blogService: BlogService) {}

  @Get() // GET 요청 처리하기
  getAllPost() {
    console.log("모든 게시글 가져오기");
    return this.blogService.getAllPosts();
  }

  @Post() // POST 요청 처리하기
  createPost(@Body() postDto: PostDto) {
    // HTTP 요청의 body 내용을 post에 할당
    console.log("게시글 작성");
    this.blogService.createPost(postDto);
    return "success";
  }

  @Get("/:id") // GET 요청에 URL 매개변수에 id가 있는 요청 처리
  getPost(@Param("id") id: string) {
    console.log("게시글 하나 가져오기");
    return this.blogService.getPost(id);
  }

  @Delete("/:id") // DELETE 방식에 URL 매개변수로 id가 있는 요청 처리
  deletePost(@Param("id") id: string) {
    console.log("게시글 삭제");
    this.blogService.delete(id);
    return "success";
  }

  @Put("/:id") // PUT 방식에 URL 매개변수로 전달된 id가 있는 요청 처리
  updatePost(@Param("id") id: string, @Body() postDto: PostDto) {
    console.log("게시글 업데이트", id, postDto);
    return this.blogService.updatePost(id, postDto);
  }
}
위의 코드에서 Get, Post, Delete, Put 등의 데코레이터는 모두 함수에 붙이는 것으로, HTTP 요청 방식에 따라 해당 데코레이터가 붙은 함수를 실행합니다. @Body는 함수의 body로 오는 값을 매개변수에 할당하며, @Param은 URL param의 값을 함수 매개변수에 할당합니다.
blog.service.ts
import { Injectable } from "@nestjs/common";
import { PostDto } from "./dtos/blog.dto";

@Injectable()
export class BlogService {
  posts: PostDto[] = []; // 게시글 배열 선언

  // 모든 게시글 가져오기
  getAllPosts() {
    return this.posts;
  }

  // 게시글 작성
  createPost(postDto: PostDto) {
    const id = this.posts.length + 1;
    this.posts.push({
      id: id.toString(),
      ...postDto,
      createdAt: new Date(),
    });
  }

  // 게시글 하나 가져오기
  getPost(id: string) {
    const post = this.posts.find((post) => post.id === id);
    console.log(post);
    return post;
  }

  // 게시글 삭제
  delete(id: string) {
    const filteredPosts = this.posts.filter((post) => post.id !== id);
    this.posts = [...filteredPosts];
  }

  // 게시글 업데이트
  updatePost(id: string, postDto: PostDto) {
    const updateIdx = this.posts.findIndex((post) => post.id === id);
    const updatePost = { id, ...postDto, updatedAt: new Date() };
    this.posts[updateIdx] = updatePost;
    return updatePost;
  }
}
Blog API 로직을 위와 같이 service 파일에 작성합니다.
blog.module.ts
import { Module } from "@nestjs/common";
import { BlogController } from "./blog.controller";
import { BlogService } from "./blog.service";

@Module({
  imports: [],
  controllers: [BlogController],
  providers: [BlogService],
  exports: [],
})
export class BlogModule {}
위와 같이 blog 컨트롤러와 서비스를 모듈 파일에 선언합니다.
blog.dto.ts
// 게시글의 타입을 인터페이스로 정의
export interface PostDto {
  id: string;
  title: string;
  content: string;
  name: string;
  createdAt: Date;
  updatedAt?: Date; // 수정 일시는 필수가 아님.
}
Dto란 data transfer object의 약자입니다. 주로 데이터 전송을 위한 객체로, 애플리케이션 계층 간에 데이터를 주고받을 때 사용됩니다. 타입스크립트에서는 데이터만 가지고 있는 타입을 선언할 때 클래스보다는 인터페이스를 많이 사용합니다.
app.module.ts
작성한 Blog 모듈을 사용하기 위해 다음과 같이 app 디렉토리의 최상위 모듈 파일에 모듈을 import 합니다.
import { Module } from "@nestjs/common";
import { AppController } from "./app.controller";
import { AppService } from "./app.service";
import { BlogModule } from "./modules/blog/blog.module";

// 모듈 데코레이터
@Module({
  imports: [BlogModule],
  controllers: [AppController],
  providers: [AppService],
})
export class AppModule {}
Step 5 - Postman으로 테스트하기
서버 실행하기
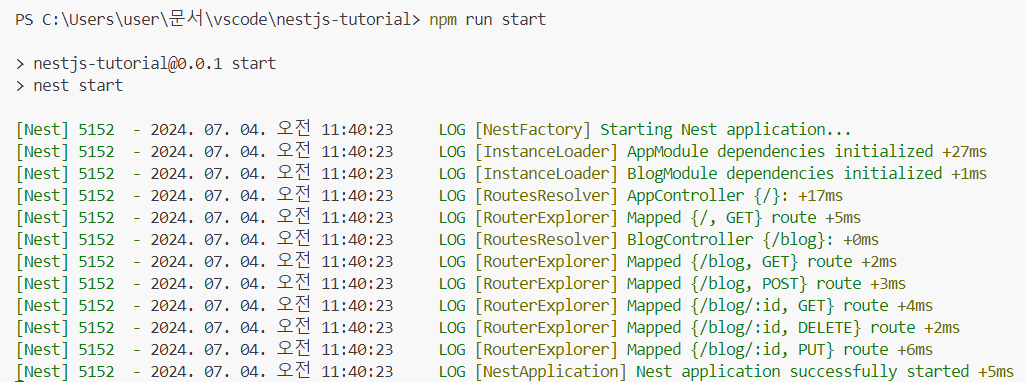
Postman을 사용하여 위의 API가 잘 작동하는지 확인하도록 하겠습니다. 먼저 다음 명령어를 입력하여 서버를 시작합니다.
npm run start
서버를 시작하는 방법은 위 방법 외에도 다음과 같은 방법이 있습니다. 이에 대해선 package.json 파일을 참고하시길 바랍니다.
npm run start      // 서버 시작
npm run start:dev  // development 모드로 실행할 때 사용
npm run start:prod // production 모드로 실행할 때 사용
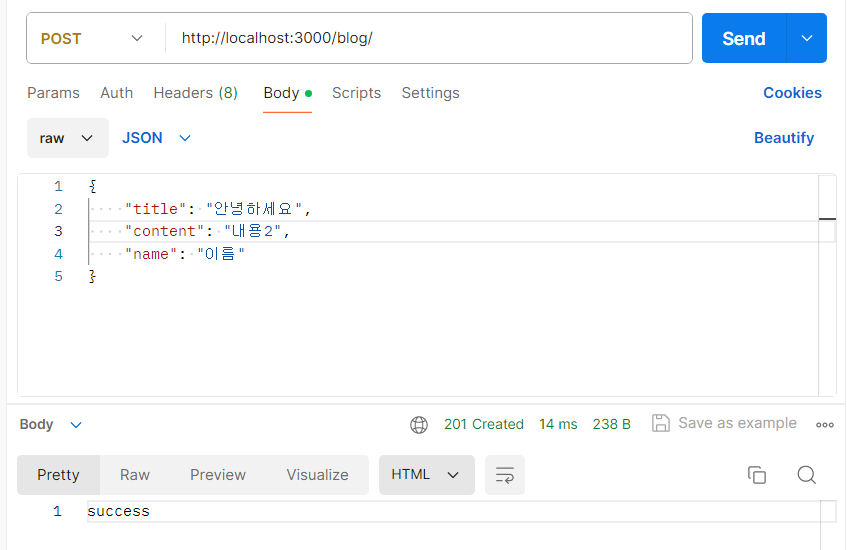
게시글 작성


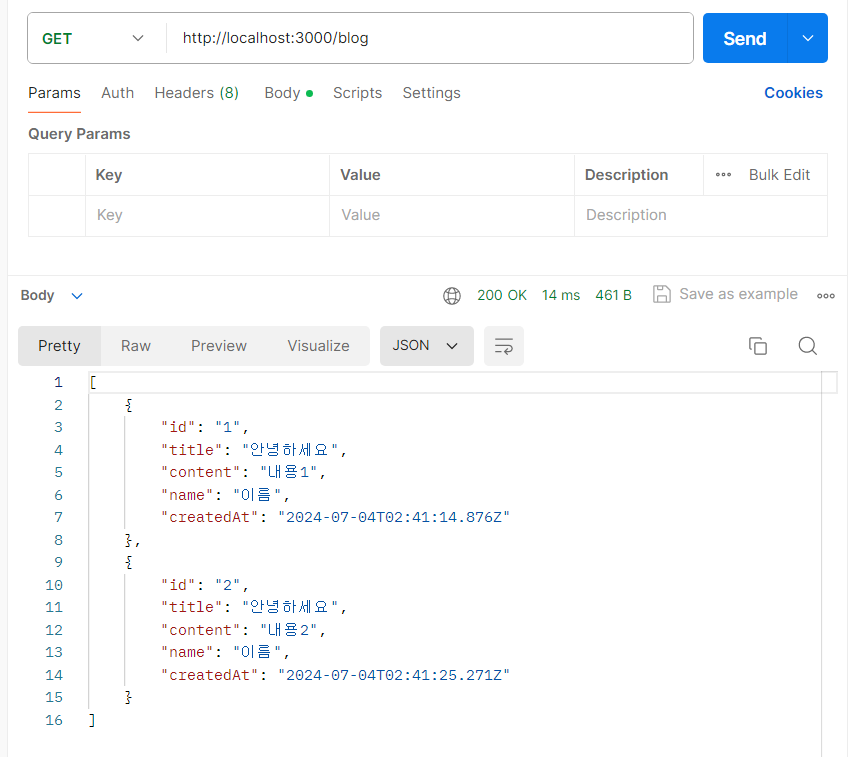
게시글 조회
