Next.js Quill 이미지 처리 방법
Next.js Quill 이미지 처리 방법에 대해 설명하는 페이지입니다.
Environment
- Next.js 14.2.3
- react-quill v2.0.0
목차
- 개요
- Step 1 - 사전 준비
- Step 2 - Quill 이미지 관련 패키지 설치하기
- Step 3 - Ref 객체
- Step 4 - 이미지 핸들러 구현하기
- Step 5 - Quill 모듈
- Step 6 - 최종 코드
- step 7 - Dynamic Import
- Step 8 - 테스트 결과
- 더 알아보기
- 참고 자료
- Comments
개요
이번 글에서는 Quill 에디터를 사용하여 이미지를 삽입할 때 base64 형식 대신 URL을 사용하는 법과 이미지 크기를 조절하는 법, 그리고 이미지 drag & drop 적용 방법을 설명하겠습니다.
Step 1 - 사전 준비
이번 글에서 사용하는 에디터는 Quill 에디터로, ReactQuill 패키지를 설치하여 사용합니다. Next.js에서 ReactQuill을 사용하는 방법은 다음 링크를 참고하시길 바랍니다.
Step 2 - Quill 이미지 관련 패키지 설치하기
Quill 에디터의 이미지 크기를 조절하기 위해 사용하는 패키지는 여러 가지가 존재합니다. 이번 글에서는 quill-image-resize-module-ts 패키지를 설치하겠습니다. 또한 이미지 drag & drop 기능을 적용하기 위해 quill-image-drop-and-paste 패키지를 설치하겠습니다. 다음 명령어를 입력하여 quill-image-resize-module-ts 패키지와 quill-image-drop-and-paste 패키지를 설치합니다.
npm install quill-image-resize-module-ts quill-image-drop-and-paste
Step 3 - Ref 객체
다음과 같이 Ref 객체를 정의합니다.
const quillRef = useRef<ReactQuill>(null);
quillRef는 아래의 이미지 핸들러를 통해 Quill 에디터에 이미지를 추가할 때 사용하는 Ref 객체입니다. Ref 객체를 사용함으로써 이미지를 추가할 때 img 태그의 src 부분에 base64 대신 URL을 사용할 수 있습니다.
주의할 점으로 Quill 에디터에서 Ref 객체를 사용하기 위해선 ReactQuill 모듈을 Next.js에서 지원하는 next/dynamic로 동적 임포트(dynamic import)하는 방법을 사용하면 안됩니다. 동적 임포트를 사용하는 경우 ReactQuill에서 Ref를 지정하려고 하면 오류가 발생합니다. 따라서 일반적인 방법으로 ReactQuill 모듈을 임포트하되, 해당 Quill 에디터를 사용하는 컴포넌트 자체를 동적 임포트해야 합니다.
Step 4 - 이미지 핸들러 구현하기
다음과 같이 Quill 에디터에서 이미지를 추가할 때 이미지 처리를 수행하는 이미지 핸들러를 정의합니다.
먼저 단순히 버튼을 클릭하여 이미지 처리를 수행하는 이미지 핸들러를 정의합니다.
const imageHandler = () => {
  // Step 1. 이미지 파일을 첨부할 수 있는 input을 생성합니다.
  const input = document.createElement("input");
  input.setAttribute("type", "file");
  input.setAttribute("accept", "image/*");

  // Step 2. 이미지 핸들러 실행 시, input 클릭 이벤트를 발생시킵니다.
  input.click();

  // Step 3. change 이벤트가 발생했을 때의 이미지 처리 로직을 적용합니다.
  input.addEventListener("change", () => {
    if (input.files && quillRef.current) {
      const file = input.files[0];
      const blob = new Blob([file], { type: "image/png" });
      const url = URL.createObjectURL(blob);

      const Image = Quill.import("formats/image");
      Image.sanitize = (url: string) => url;

      const editor = quillRef.current.getEditor();
      const range = editor.getSelection();

      if (range) {
        editor.insertEmbed(range.index, "image", url);
        editor.setSelection(range.index + 1, 0);

        // 이미지가 DOM에 추가된 후 이미지에 스타일을 적용하기 위해 setTimeout 사용합니다.
        setTimeout(() => {
          // Property 'style' does not exist on type 'Element'.ts(2339) 오류를
          // 방지하기 위해 타입을 any로 지정합니다.
          const imageElement: any = document.querySelector(`img[src="${url}"]`);
          if (imageElement) {
            imageElement.style.borderRadius = "1rem";
          }

          // 메모리 누수를 방지하기 위해 URL을 해제합니다.
          URL.revokeObjectURL(url);
        }, 100);
      }
    }
  });
};
위의 코드를 설명하자면 다음과 같습니다.
이미지 파일을 첨부할 수 있는 input 생성
// Step 1. 이미지 파일을 첨부할 수 있는 input을 생성합니다.
const input = document.createElement("input");
input.setAttribute("type", "file");
input.setAttribute("accept", "image/*");
먼저 이미지 파일을 첨부할 수 있는 input을 생성해야 합니다. input의 타입을
file로 지정한 뒤 이미지 파일을 첨부할 수 있도록 설정합니다.input 클릭 이벤트 실행
// Step 2. 이미지 핸들러 실행 시, input 클릭 이벤트를 발생시킵니다.
input.click();
이미지 핸들러가 실행될 경우 이미지를 첨부할 수 있도록 input 클릭 이벤트를 발생시킵니다.
이미지 처리 로직 작성
// Step 3. change 이벤트가 발생했을 때의 이미지 처리 로직을 적용합니다.
input.addEventListener("change", () => {
input의 change 이벤트가 발생했을 때의 이미지 처리 이벤트를 등록합니다.
이미지 URL 생성
const file = input.files[0];
const blob = new Blob([file], { type: "image/png" });
const url = URL.createObjectURL(blob);
먼저 파일을 blob 객체로 변환시킵니다. 이후 변환된 blob 객체를 통해 이미지 URL를 생성합니다.
Image.sanitize
const Image = Quill.import("formats/image");
Image.sanitize = (url: string) => url;
위에서 생성된 이미지 URL을 Quill 에디터에서 사용하려고 하면
"//:0"와 같이 추가되는 문제가 있습니다. 해당 문제를 해결하기 위해 위와 같이 Image.sanitize 로직을 작성합니다.이미지 추가
const editor = quillRef.current.getEditor();
const range = editor.getSelection();

if (range) {
  editor.insertEmbed(range.index, "image", url);
  editor.setSelection(range.index + 1, 0);

  (...)
}
생성된 이미지 URL을 사용하여 Quill 에디터에 이미지를 삽입합니다.
이미지 style 지정
// 이미지가 DOM에 추가된 후 이미지에 스타일을 적용하기 위해 setTimeout 사용합니다.
setTimeout(() => {
  // Property 'style' does not exist on type 'Element'.ts(2339) 오류를
  // 방지하기 위해 타입을 any로 지정합니다.
  const imageElement: any = document.querySelector(`img[src="${url}"]`);
  if (imageElement) {
    imageElement.style.borderRadius = "1rem";
  }

  // 메모리 누수를 방지하기 위해 URL을 해제합니다.
  URL.revokeObjectURL(url);
}, 100);
삽입된 이미지의 style을 변경하고 싶은 경우 위와 같이 추가된 이미지에 접근할 수 있습니다. 위의 예시는 이미지의 border-radius을
1rem으로 지정하는 코드입니다.
다음으로 이미지 drag & drop을 처리하는 이미지 핸들러를 정의합니다.
/**
 * @param imageDataUrl image's dataURL
 * @param type image's mime type
 * @param imageData provided more functions to handle the image
 * - imageData.toBlob() {function} - convert image to a BLOB Object
 * - imageData.toFile(filename?: string) {function} - convert image to a File Object. filename is optional, it will generate a random name if the original image didn't have a name.
 * - imageData.minify(options) {function)- minify the image, return a promise
 *   - options.maxWidth {number} - specify the max width of the image, default is 800
 *   - options.maxHeight {number} - specify the max height of the image, default is 800
 *   - options.quality {number} - specify the quality of the image, default is 0.8
 */
const imageDropAndPasteHandler = async (
  imageDataUrl: string,
  type: string,
  imageData: ImageData
) => {
  const file = imageData.toFile();

  if (!file || !quillRef.current) {
    return;
  }

  const blob = new Blob([file], { type: "image/png" });
  const url = URL.createObjectURL(blob);

  const Image = Quill.import("formats/image");
  Image.sanitize = (url: string) => url;

  const editor = quillRef.current.getEditor();
  const range = editor.getSelection();

  if (range) {
    editor.insertEmbed(range.index, "image", url);
    editor.setSelection(range.index + 1, 0);

    // 이미지가 DOM에 추가된 후 이미지에 스타일을 적용하기 위해 setTimeout 사용합니다.
    setTimeout(() => {
      // Property 'style' does not exist on type 'Element'.ts(2339) 오류를
      // 방지하기 위해 타입을 any로 지정합니다.
      const imageElement: any = document.querySelector(`img[src="${url}"]`);
      if (imageElement) {
        imageElement.style.borderRadius = "1rem";
      }

      // 메모리 누수를 방지하기 위해 URL을 해제합니다.
      URL.revokeObjectURL(url);
    }, 100);
  }
};
위의 코드를 보면 알 수 있듯이, 이미지를 가져오는 부분만 다르고 비즈니스 로직은 동일합니다.
Step 5 - Quill 모듈
다음과 같이 Quill 모듈을 정의합니다.
const modules = useMemo(() => {
  ReactQuill.Quill.register("modules/imageResize", ImageResize);
  ReactQuill.Quill.register("modules/imageDropAndPaste", ImageDropAndPaste);

  return {
    // 더 많은 옵션은 다음 링크를 참고할 것.
    // https://quilljs.com/docs/modules/toolbar
    toolbar: {
      container: [
        [{ size: ["small", false, "large", "huge"] }, { font: [] }],
        [{ color: [] }, { background: [] }],
        [{ list: "ordered" }, { list: "bullet" }, { list: "check" }],
        ["bold", "italic", "underline", "strike"],
        [{ indent: "-1" }, { indent: "+1" }, { align: [] }],
        ["link", "image", "video"],
      ],
      handlers: { image: imageHandler },
    },
    imageResize: {
      modules: ["Resize", "DisplaySize", "Toolbar"],
      handleStyles: {
        backgroundColor: "#00B488",
        border: "none",
        // other camelCase styles for size display
      },
    },
    imageDropAndPaste: {
      // add an custom image handler
      handler: imageDropAndPasteHandler,
    },
  };
}, []);
위의 코드를 설명하자면 다음과 같습니다.
useMemo()렌더링이 발생할 때 모듈 객체가 재생성되는 것을 방지합니다.
ReactQuill.Quill.register("modules/imageResize", ImageResize);이미지 크기 수정 모듈을 적용합니다.
handlers: { image: imageHandler }위에서 정의한 이미지 핸들러를 적용합니다.
imageResize이미지 크기 수정 기능을 적용합니다.
imageDropAndPaste이미지 drag & drop 기능을 적용합니다.
Step 6 - 최종 코드
최종 코드는 다음과 같습니다.
QuillEditorContainer.tsx
"use client";

import QuillEditor from "@/components/diary/write/QuillEditor";
import useDiaryEditorStore from "@/store/diaryEditorStore";
import { ImageResize } from "quill-image-resize-module-ts";
import ImageDropAndPaste, { ImageData } from "quill-image-drop-and-paste";
import { useMemo, useRef } from "react";
import ReactQuill, { Quill } from "react-quill";

const QuillEditorContainer = () => {
  const diaryEditorStore = useDiaryEditorStore();
  const quillRef = useRef<ReactQuill>(null);

  const imageHandler = () => {
    // Step 1. 이미지 파일을 첨부할 수 있는 input을 생성합니다.
    const input = document.createElement("input");
    input.setAttribute("type", "file");
    input.setAttribute("accept", "image/*");

    // Step 2. 이미지 핸들러 실행 시, input 클릭 이벤트를 발생시킵니다.
    input.click();

    // Step 3. change 이벤트가 발생했을 때의 이미지 처리 로직을 적용합니다.
    input.addEventListener("change", () => {
      if (input.files && quillRef.current) {
        const file = input.files[0];
        const blob = new Blob([file], { type: "image/png" });
        const url = URL.createObjectURL(blob);

        const Image = Quill.import("formats/image");
        Image.sanitize = (url: string) => url;

        const editor = quillRef.current.getEditor();
        const range = editor.getSelection();

        if (range) {
          editor.insertEmbed(range.index, "image", url);
          editor.setSelection(range.index + 1, 0);

          // 이미지가 DOM에 추가된 후 이미지에 스타일을 적용하기 위해 setTimeout 사용합니다.
          setTimeout(() => {
            // Property 'style' does not exist on type 'Element'.ts(2339) 오류를
            // 방지하기 위해 타입을 any로 지정합니다.
            const imageElement: any = document.querySelector(
              `img[src="${url}"]`
            );
            if (imageElement) {
              imageElement.style.borderRadius = "1rem";
            }

            // 메모리 누수를 방지하기 위해 URL을 해제합니다.
            URL.revokeObjectURL(url);
          }, 100);
        }
      }
    });
  };

  /**
   * @param imageDataUrl image's dataURL
   * @param type image's mime type
   * @param imageData provided more functions to handle the image
   * - imageData.toBlob() {function} - convert image to a BLOB Object
   * - imageData.toFile(filename?: string) {function} - convert image to a File Object. filename is optional, it will generate a random name if the original image didn't have a name.
   * - imageData.minify(options) {function)- minify the image, return a promise
   *   - options.maxWidth {number} - specify the max width of the image, default is 800
   *   - options.maxHeight {number} - specify the max height of the image, default is 800
   *   - options.quality {number} - specify the quality of the image, default is 0.8
   */
  const imageDropAndPasteHandler = async (
    imageDataUrl: string,
    type: string,
    imageData: ImageData
  ) => {
    const file = imageData.toFile();

    if (!file || !quillRef.current) {
      return;
    }

    const blob = new Blob([file], { type: "image/png" });
    const url = URL.createObjectURL(blob);

    const Image = Quill.import("formats/image");
    Image.sanitize = (url: string) => url;

    const editor = quillRef.current.getEditor();
    const range = editor.getSelection();

    if (range) {
      editor.insertEmbed(range.index, "image", url);
      editor.setSelection(range.index + 1, 0);

      // 이미지가 DOM에 추가된 후 이미지에 스타일을 적용하기 위해 setTimeout 사용합니다.
      setTimeout(() => {
        // Property 'style' does not exist on type 'Element'.ts(2339) 오류를
        // 방지하기 위해 타입을 any로 지정합니다.
        const imageElement: any = document.querySelector(`img[src="${url}"]`);
        if (imageElement) {
          imageElement.style.borderRadius = "1rem";
        }

        // 메모리 누수를 방지하기 위해 URL을 해제합니다.
        URL.revokeObjectURL(url);
      }, 100);
    }
  };

  const modules = useMemo(() => {
    ReactQuill.Quill.register("modules/imageResize", ImageResize);
    ReactQuill.Quill.register("modules/imageDropAndPaste", ImageDropAndPaste);

    return {
      // 더 많은 옵션은 다음 링크를 참고할 것.
      // https://quilljs.com/docs/modules/toolbar
      toolbar: {
        container: [
          [{ size: ["small", false, "large", "huge"] }, { font: [] }],
          [{ color: [] }, { background: [] }],
          [{ list: "ordered" }, { list: "bullet" }, { list: "check" }],
          ["bold", "italic", "underline", "strike"],
          [{ indent: "-1" }, { indent: "+1" }, { align: [] }],
          ["link", "image", "video"],
        ],
        handlers: { image: imageHandler },
      },
      imageResize: {
        modules: ["Resize", "DisplaySize", "Toolbar"],
        handleStyles: {
          backgroundColor: "#00B488",
          border: "none",
          // other camelCase styles for size display
        },
      },
      imageDropAndPaste: {
        // add an custom image handler
        handler: imageDropAndPasteHandler,
      },
    };
  }, []);

  return (
    <QuillEditor
      quillRef={quillRef}
      modules={modules}
      content={diaryEditorStore.contents[diaryEditorStore.currentDay - 1]}
      onChange={(value: string) =>
        diaryEditorStore.changeContent(diaryEditorStore.currentDay - 1, value)
      }
    />
  );
};

export default QuillEditorContainer;
QuillEditor.tsx
import "react-quill/dist/quill.snow.css";
import "@/styles/quillEditor.css";
import ReactQuill from "react-quill";
import { RefObject } from "react";

interface Props {
  quillRef: RefObject<ReactQuill>;
  modules: {};
  content: string;
  onChange: (value: string) => void;
}

const QuillEditor = ({ quillRef, modules, content, onChange }: Props) => {
  return (
    <ReactQuill
      ref={quillRef}
      theme="snow"
      placeholder="여행은 어땠나요? 자유롭게 기록하고 싶은 것들을 작성해보세요."
      onChange={(value, delta, source, editor) => {
        onChange(value);
      }}
      value={content}
      modules={modules}
    />
  );
};

export default QuillEditor;
step 7 - Dynamic Import
다음과 같이 Quill 에디터를 사용하는 컴포넌트를 동적 임포트합니다.
(...)

import dynamic from "next/dynamic";
import QuillEditorSkeleton from "@/components/skeleton/diary/write/QuillEditorSkeleton";

const QuillEditorContainer = dynamic(
  () => import("@/containers/diary/write/QuillEditorContainer"),
  {
    ssr: false,
    loading: () => <QuillEditorSkeleton />,
  }
);

(...)
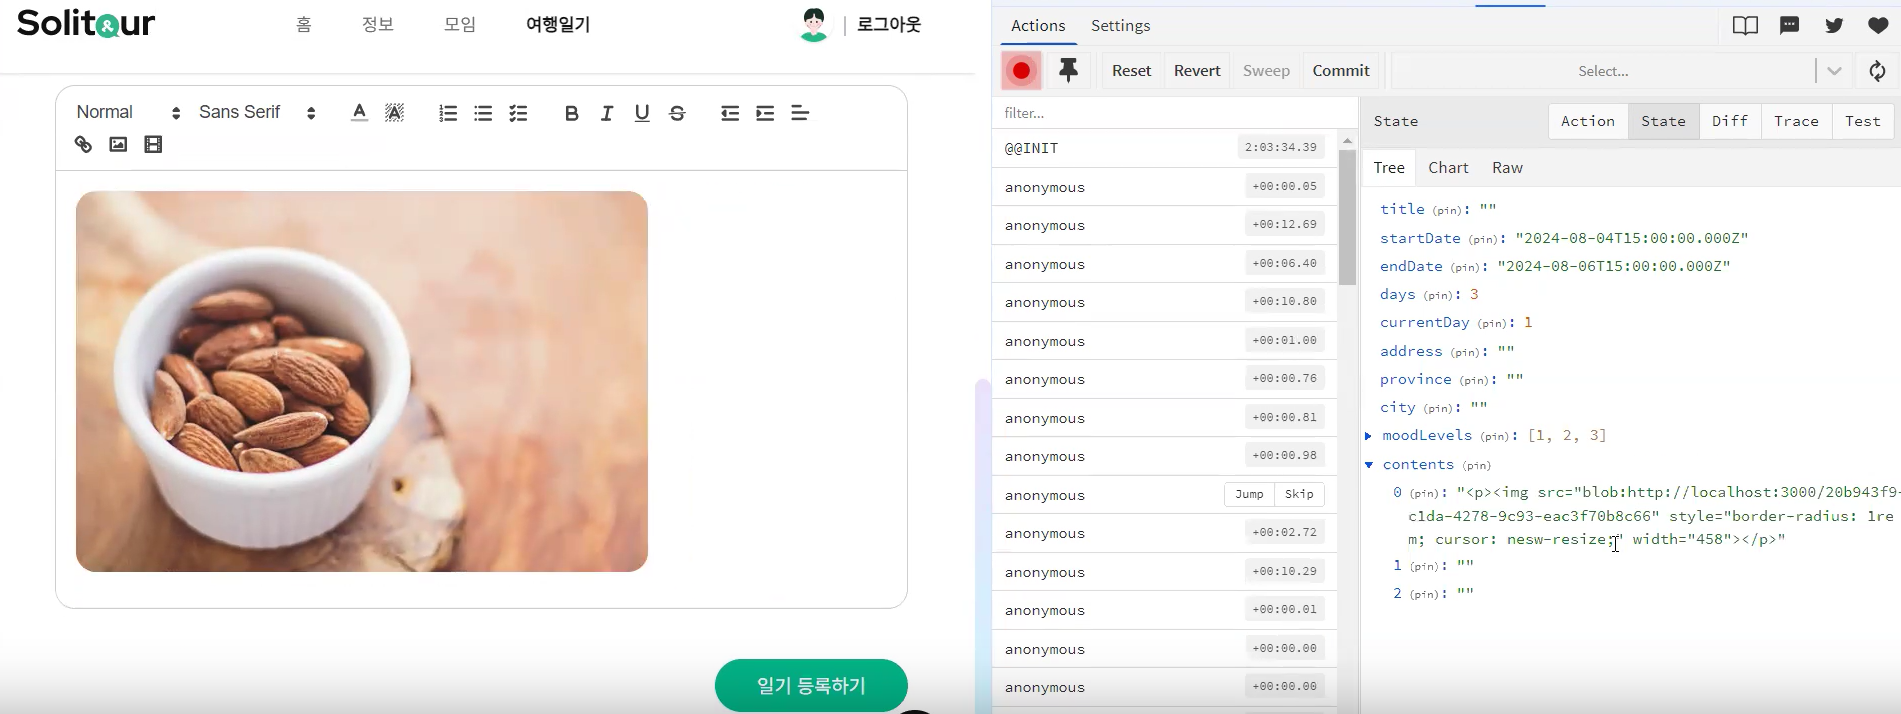
Step 8 - 테스트 결과
테스트 결과는 다음과 같습니다.
더 알아보기
위의 소스 코드는 제가 참여하고 있는 프로젝트의 소스 코드에서 가져온 것입니다. 프로젝트 내에서 사용된 방법을 확인하려면 다음 GitHub 링크를 참고하시길 바랍니다.